If you’re planning to create a WordPress website, Hostinger is one of the best hosting providers to get started. It offers an easy-to-use control panel, one-click WordPress installation, fast servers, and affordable hosting plans, making it an excellent choice for beginners, bloggers, businesses, and developers.
Besides WordPress hosting, Hostinger provides a wide range of web hosting services, including:
- Free Domain Name (with eligible hosting plans)
- Managed WordPress Hosting
- Shared Web Hosting
- Cloud Hosting
- VPS Hosting
- Business Email Hosting
- Domain Registration and Management
- Hosting Solutions for Developers and Agencies
In this step-by-step guide, you’ll learn how to install WordPress on Hostinger using its one-click installer. No coding or technical experience is required.
Why Choose Hostinger for WordPress?
Hostinger has become one of the most popular web hosting providers because it offers an excellent balance of performance, affordability, and ease of use. Whether you’re launching your first website or managing multiple WordPress projects, Hostinger provides the tools needed to get your site online quickly.
One of its biggest advantages is the custom hPanel, which makes managing websites much simpler than traditional hosting control panels. Installing WordPress takes only a few minutes, and most hosting plans include features that help improve website speed, security, and reliability.
Benefits of Using Hostinger for WordPress
- Affordable hosting plans for beginners and businesses
- One-click WordPress installation
- Free SSL certificate
- Free domain name with eligible plans
- Managed WordPress hosting options
- Fast LiteSpeed web servers
- Automatic WordPress updates
- Daily or weekly backups (depending on the hosting plan)
- Built-in caching for improved website performance
- 24/7 customer support
- User-friendly hPanel dashboard
- Easy website migration tools
If you’re looking for a reliable, beginner-friendly hosting provider with excellent performance and competitive pricing, Hostinger is one of the best options for running a WordPress website in 2026.
What You Need Before Installing WordPress
Before you install WordPress on Hostinger, there are two things you’ll need to have ready. Without them, you won’t be able to launch your website.
- Hostinger Hosting Plan
- Domain Name
1. Purchase a Hostinger Hosting Plan
The first step is to purchase a hosting plan from Hostinger. Depending on your website’s requirements, Hostinger offers several WordPress hosting plans, including Premium, Business, and Cloud Startup.
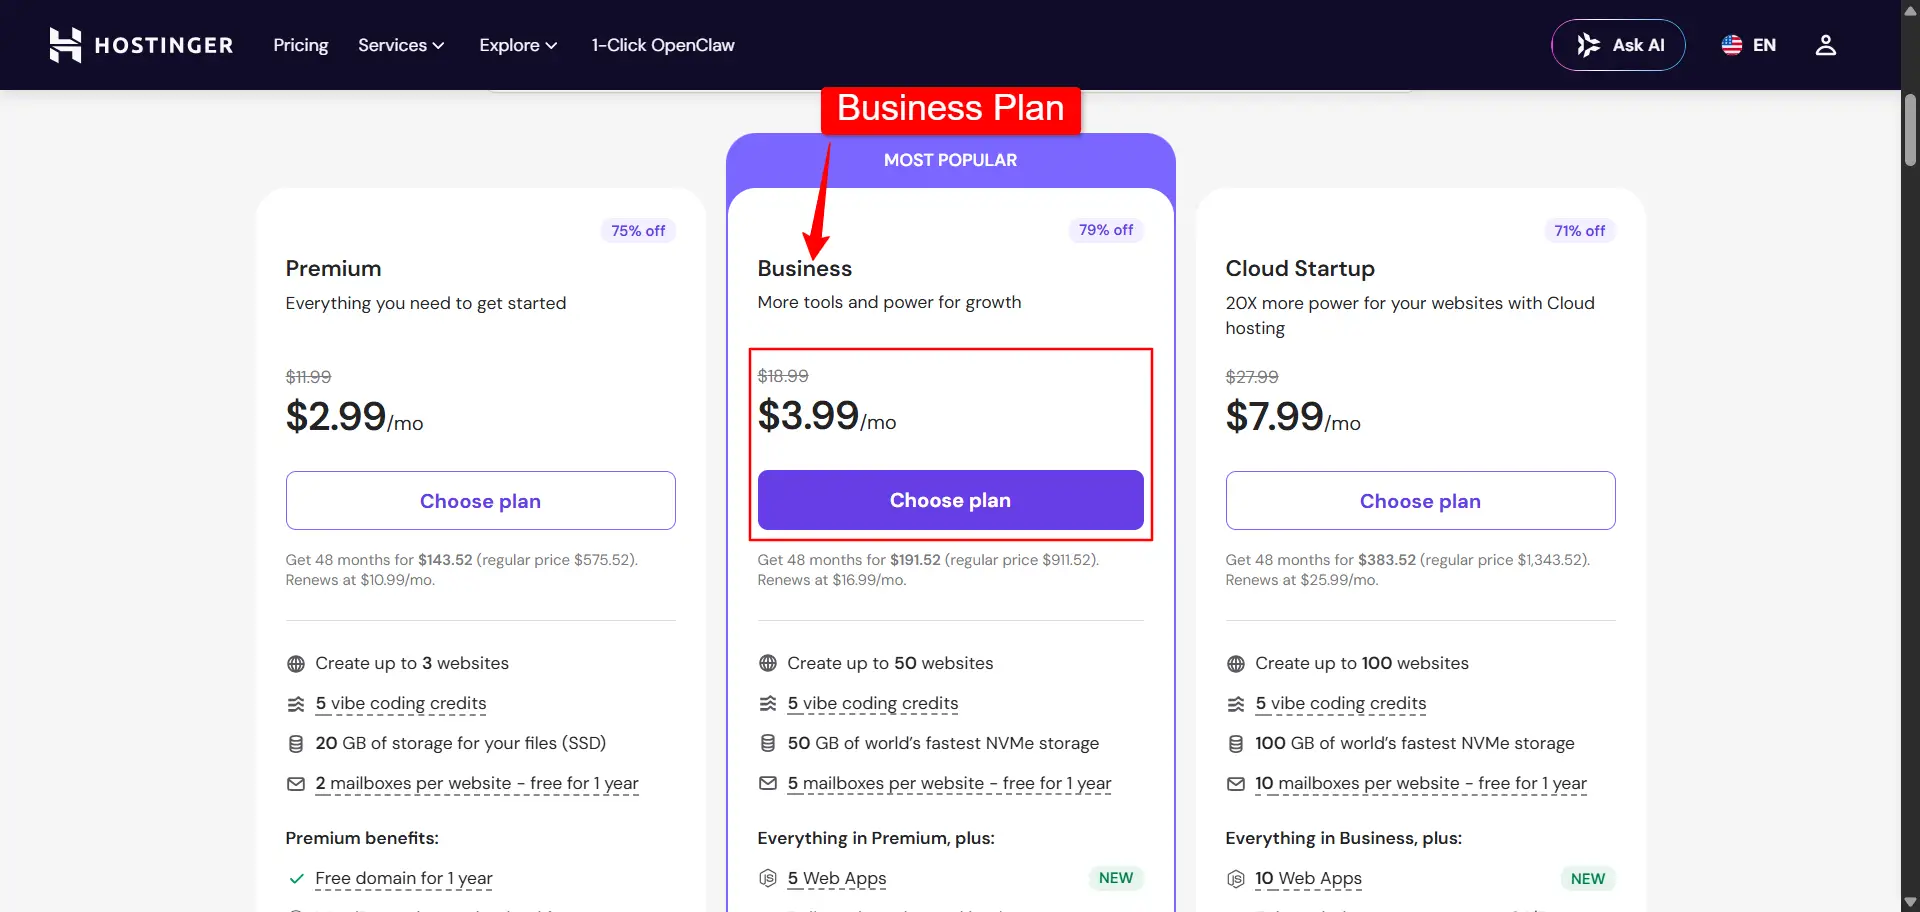
Each plan is designed for different types of websites. If you’re creating a personal blog or a small business website, the Premium plan may be sufficient. However, if you expect higher traffic, need better performance, or plan to host multiple websites, the Business plan is a better option.
Before purchasing, take a moment to evaluate your website’s requirements, expected traffic, storage needs, and future growth. Choosing the right hosting plan from the beginning can save you time and make it easier to scale your website later.
Recommendation: If you’re unsure which plan to choose, I recommend starting with the Hostinger Business plan. It provides an excellent balance of performance, features, and pricing, making it a great choice for most new WordPress websites.
2. Register a Domain Name
The next step is to register a domain name for your website. A domain name is your website’s unique address on the internet, such as www.yourwebsite.com. It’s the URL visitors type into their browser to access your website.
There are many trusted domain registrars where you can purchase a domain name, including Hostinger, Namecheap, and GoDaddy. All of these providers offer domain registration, DNS management, domain privacy options, and customer support to help you manage your domain.
Once you’ve registered your domain name and connected it to your Hostinger hosting account, you’re ready to install WordPress and start building your website.
Step 1: Log in to Hostinger hPanel
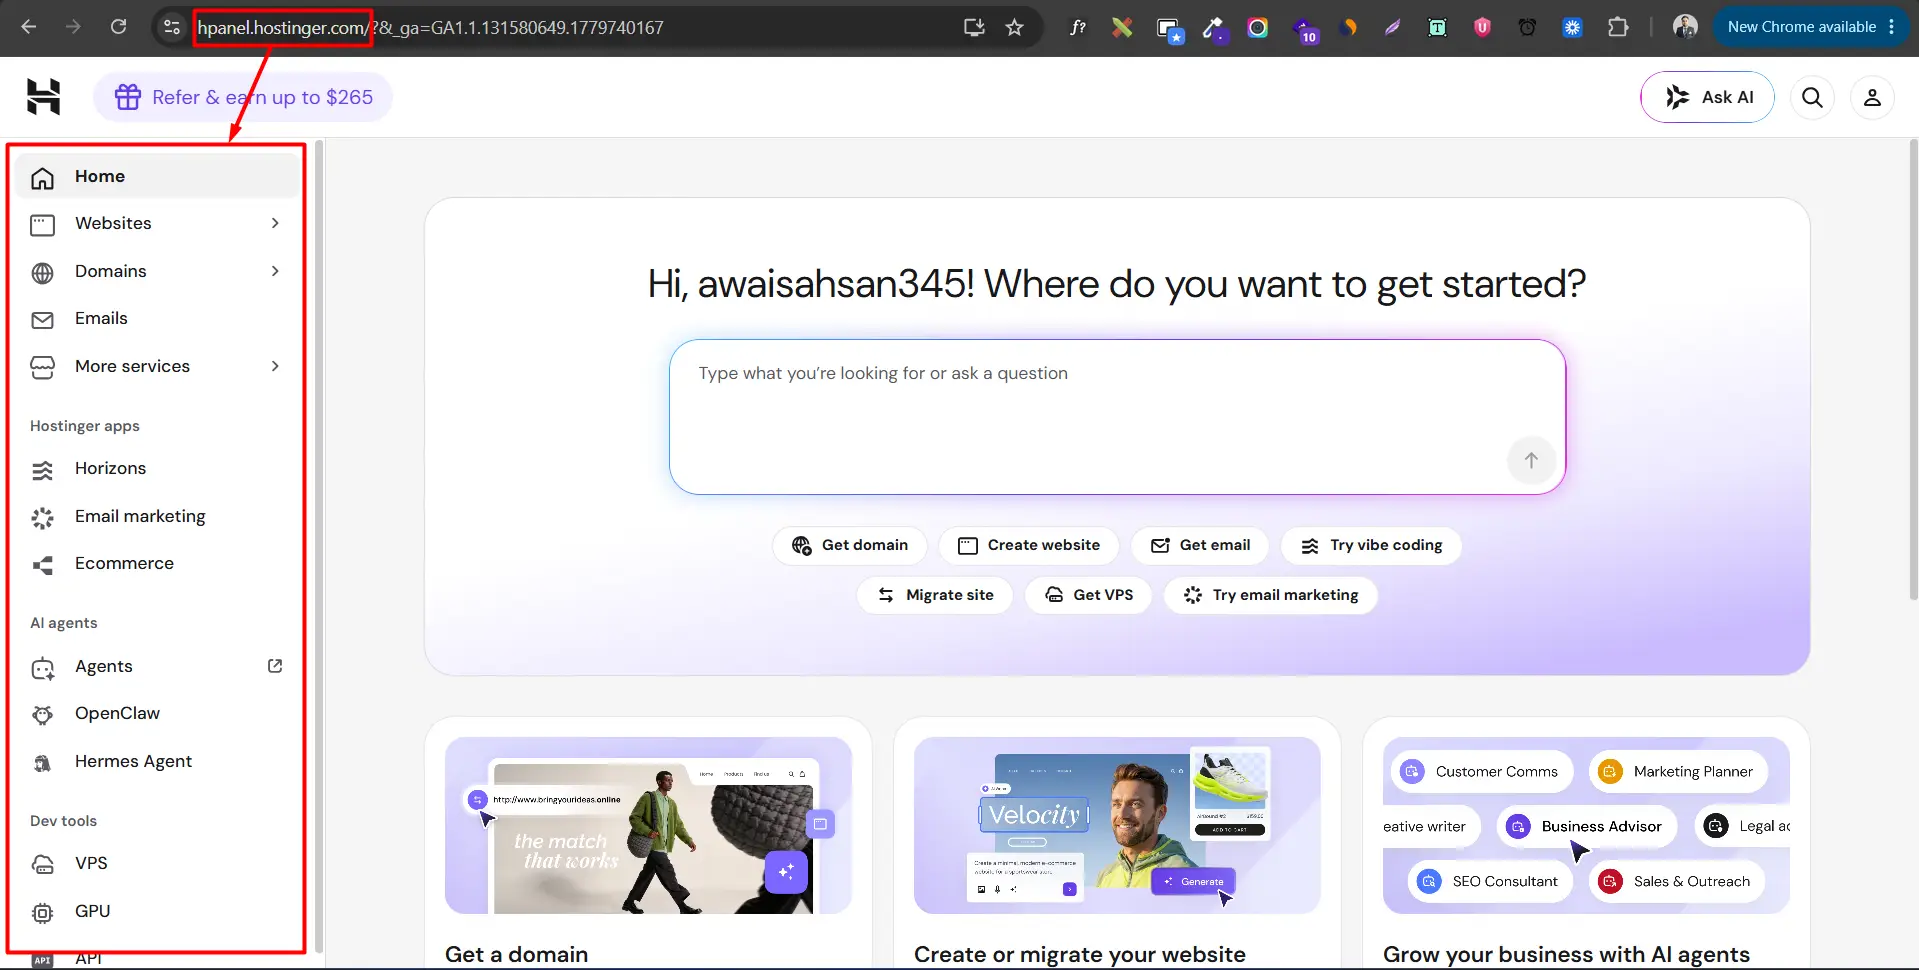
After purchasing your Hostinger hosting plan and registering your domain name, the next step is to log in to your Hostinger hPanel.
To log in:
- Visit the Hostinger login page.
- Enter the email address and password you used when creating your Hostinger account.
- Click the Log In button.
- Once you’re logged in, you’ll be redirected to the hPanel Dashboard, where you can manage your hosting account.
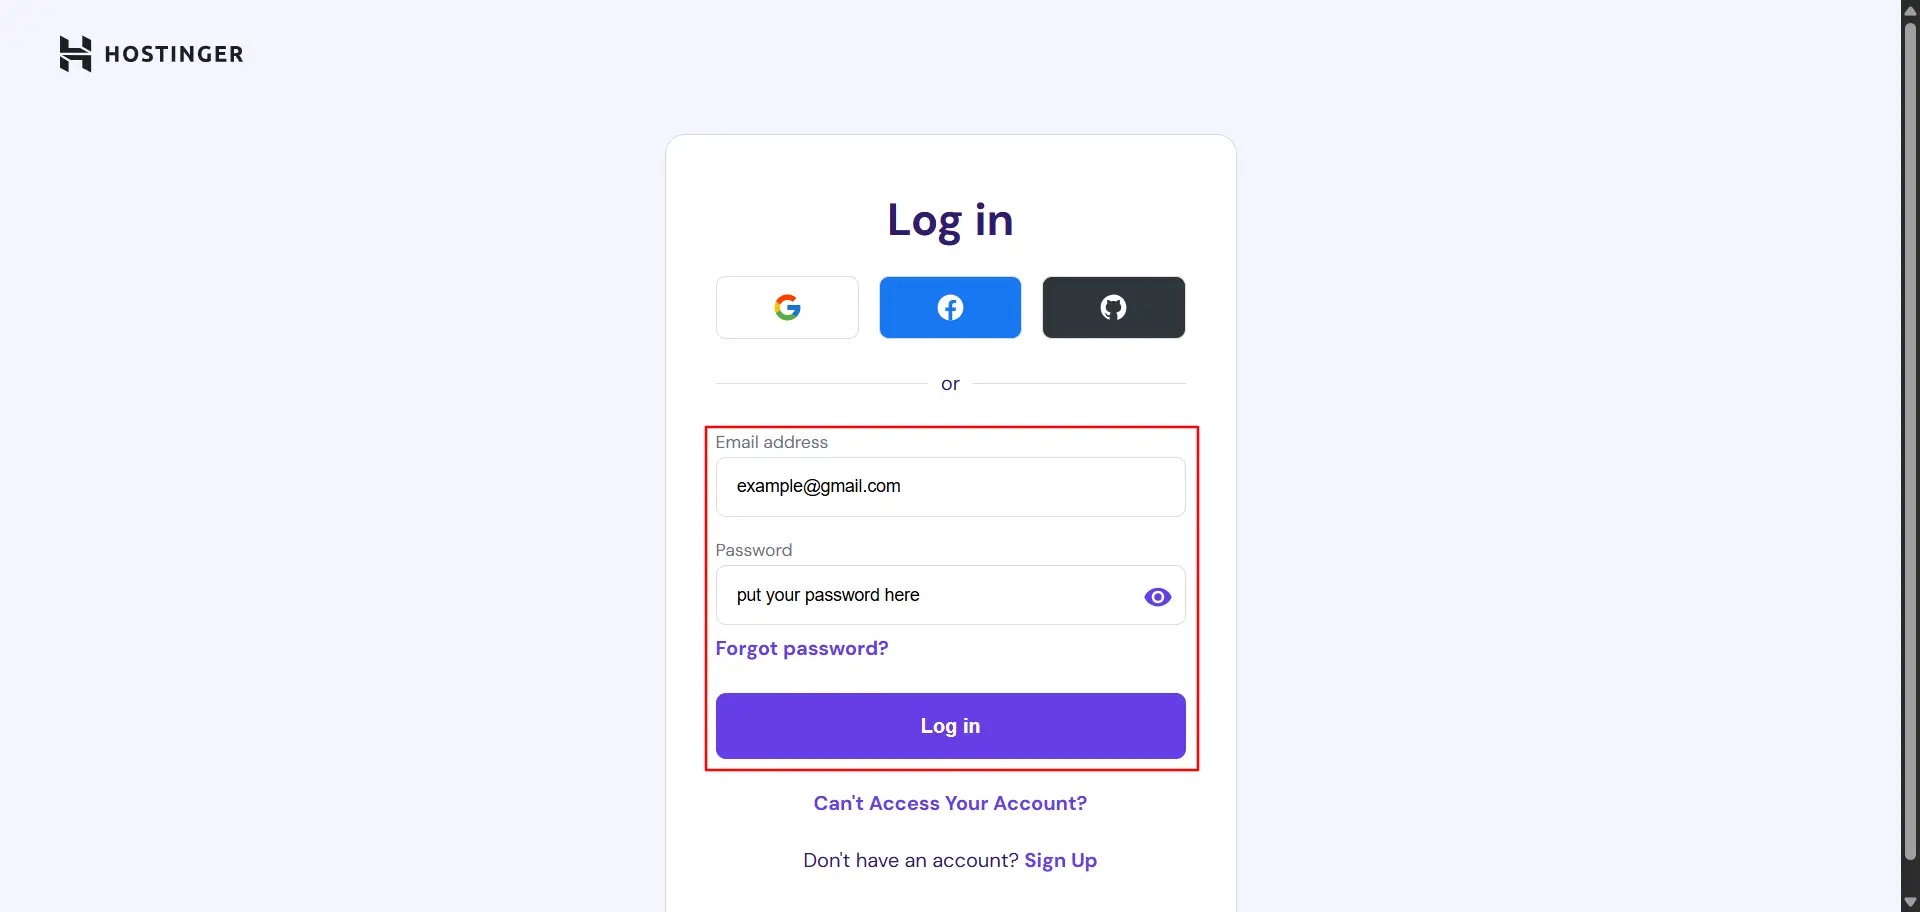
From the hPanel dashboard, you’ll be ready to install WordPress using Hostinger’s one-click installer in the next step.
Tip: If you’ve forgotten your password, you can reset it using the Forgot Password option on the Hostinger login page.
Step 2: Open the WordPress Auto Installer
Once you’ve successfully logged in to your Hostinger hPanel, you’ll be taken to the main dashboard where you can manage your hosting account and websites.
To start installing WordPress, navigate to:
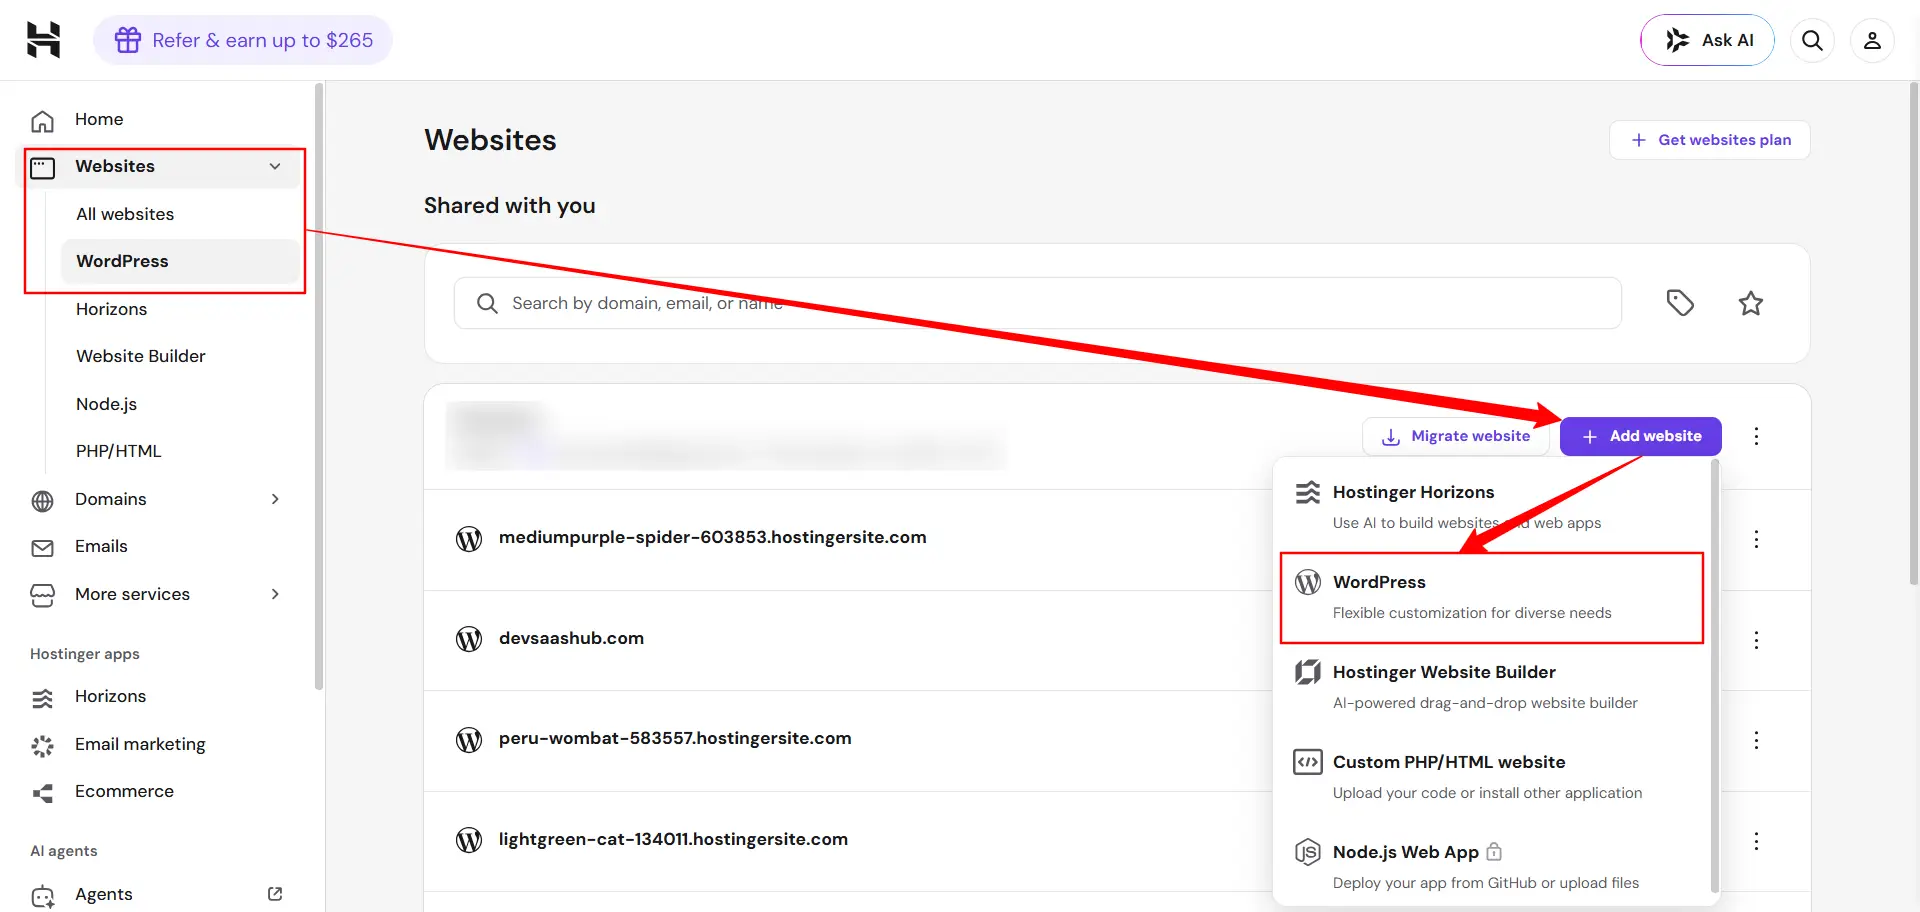
Websites → WordPress
You can find the Websites section in the left-hand sidebar. Click on it, then select WordPress to access Hostinger’s one-click WordPress installer.
This installer allows you to set up a new WordPress website in just a few minutes without manually uploading files or creating databases.
Step 3: Choose WordPress
After opening the WordPress section, click the Add Website button.
A pop-up window will appear asking you to choose the type of website you want to create. Select WordPress to continue with the automatic installation.
See the screenshot below for reference.
Step 4: Enter Website Details
Hostinger’s Auto Installer will then guide you through the remaining setup process, including creating your WordPress administrator account, selecting your domain name, and configuring the basic installation settings.
Website Domain
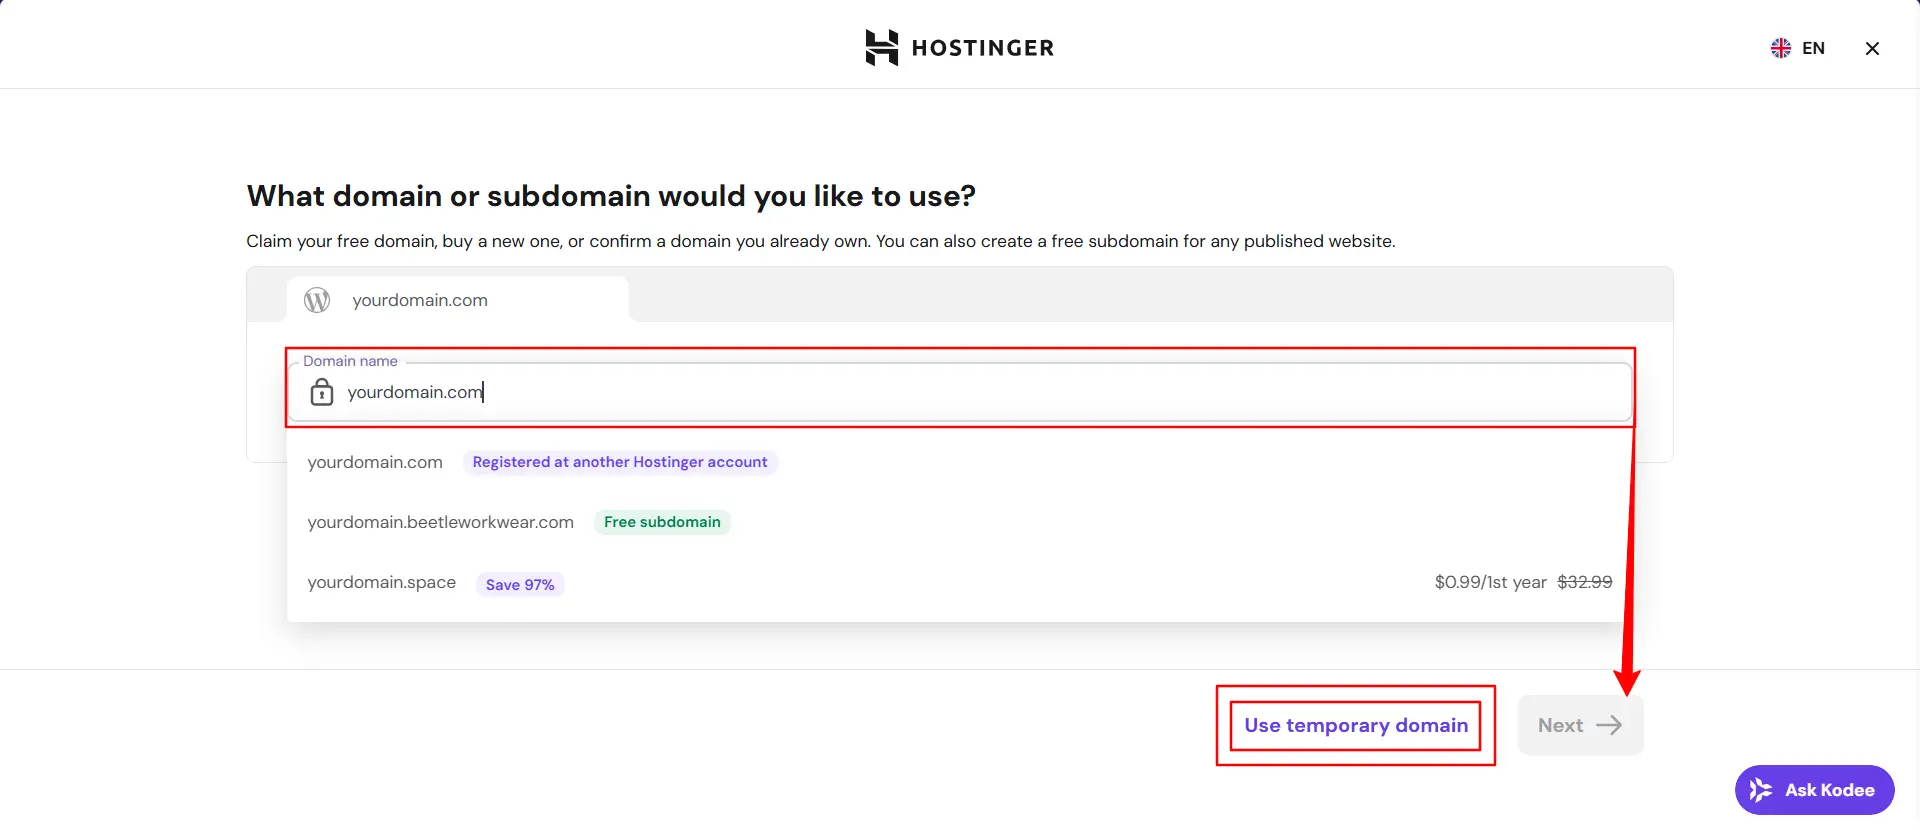
The first option is to add the domain name which is already purchased.
If you’ve already purchased a domain, simply type in the Domain Name filed. Your purchased domain will automatically prompted in the dropdown list. Simply select your domain and then click Next.
If you don’t have a domain yet, Hostinger also provides the option to use a temporary domain. This allows you to install WordPress, explore the dashboard, and start building your website before your permanent domain is ready.
Keep in mind that a temporary domain is only intended for testing or development purposes. To launch your website publicly, you’ll eventually need to register a custom domain and connect it to your hosting account.
Once you’ve selected your domain (or temporary domain), click the Next button to continue with the installation process.
See the screenshot below for reference.
Admin Email Address (username), Password and Language
The next step is to create your WordPress administrator account. These credentials will be used to log in to your WordPress dashboard after the installation is complete, so make sure you enter them carefully.
During this step, you’ll need to configure the following:
- Website Language
- Administrator Email Address (Username)
- Administrator Password
Choose Your Website Language
First, select the language you want to use for your WordPress website. This will determine the language of the WordPress dashboard, menus, and default system messages.
For example, if you’re building an English website, select English. If your website will be in another language, such as Chinese, Spanish, or French, choose the appropriate language from the list.
Note: You can change the WordPress language later from the dashboard if needed.
Enter Your Administrator Email Address
Next, enter your email address. This email will become your WordPress administrator account and will be used for important notifications, password recovery, plugin updates, and website-related alerts.
It’s recommended to use an email address that you check regularly.
Create a Strong Password
Now create a strong password for your administrator account. Since this account has full control over your website, using a secure password is essential.
Hostinger also provides a Generate Password option. Simply click the (⚹⚹⚹) icon next to the password field to generate a strong, random password automatically.
Important: Save your administrator email and password in a secure place, such as a password manager or encrypted document. You’ll need these credentials every time you log in to your WordPress dashboard.
Once you’ve completed these fields, click Build from Scratch to continue with the WordPress installation.
See the screenshot below for reference.
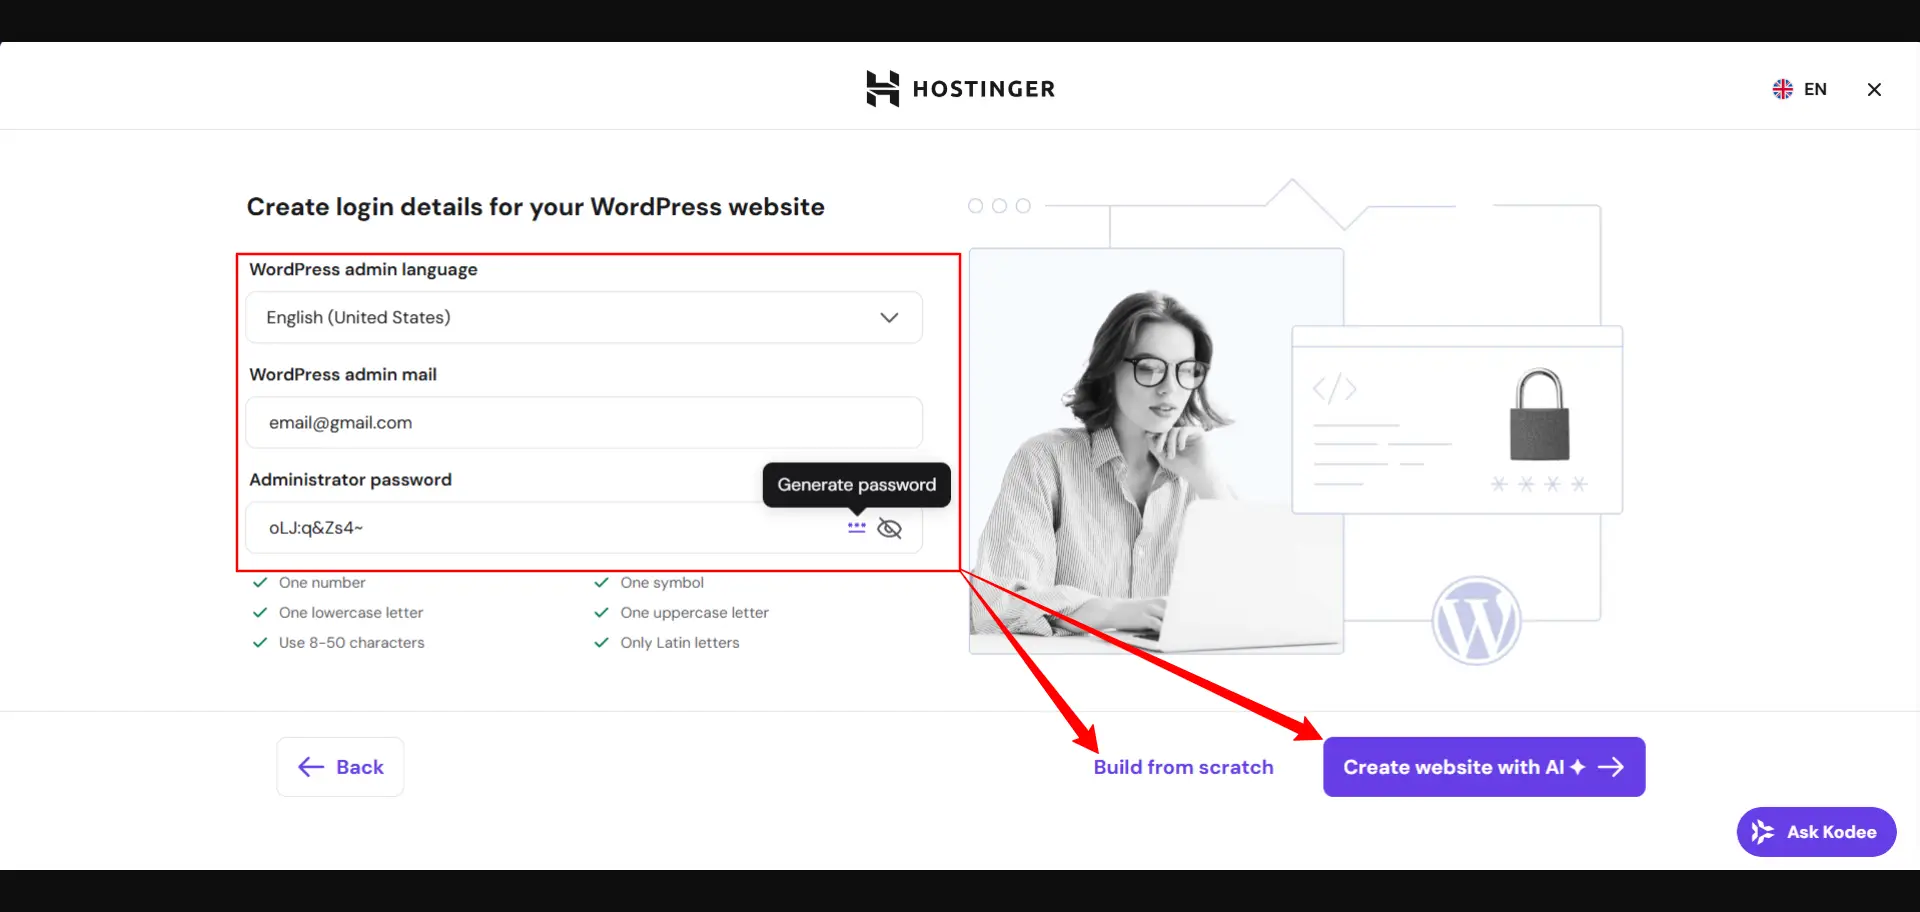
You’ll notice two options: Build from Scratch and Create Website with AI. I recommend choosing Build from Scratch. While the AI option can quickly generate a basic website, it often requires additional customization and optimization. Building your website from scratch gives you more control over the design, functionality, and SEO, resulting in a cleaner and better-optimized WordPress website.
Step 5: Complete the Installation
Click the Build from Scratch button to start the installation. The process usually takes less than a minute. Once it’s complete, your WordPress website will be ready to use.
Step 6: Log in to the WordPress Dashboard
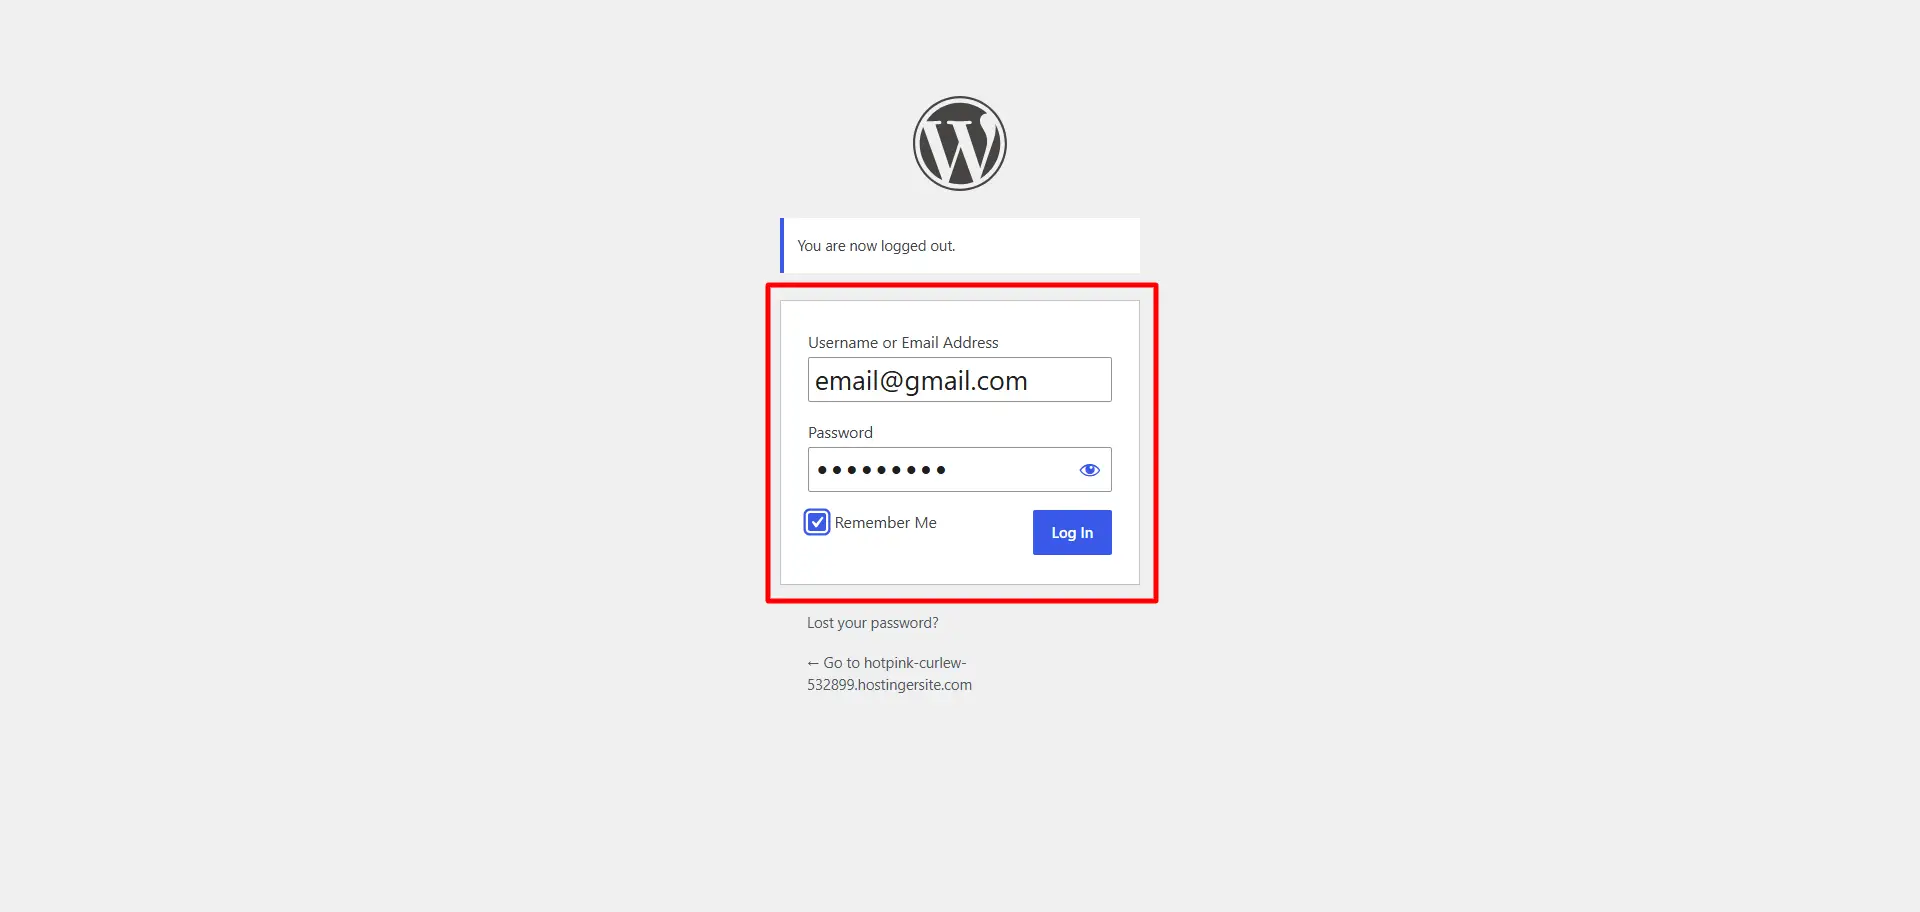
After the installation is complete, log in to your WordPress dashboard using the administrator email (or username) and password you created during the setup process.
Your login URL will be:
https://yourdomain.com/wp-admin
Replace yourdomain.com with your actual domain name.
Essential Settings After Installation
- Before you start building your website, it’s a good idea to configure a few basic settings:
- Install essential WordPress plugins for SEO, security, caching, and backups.
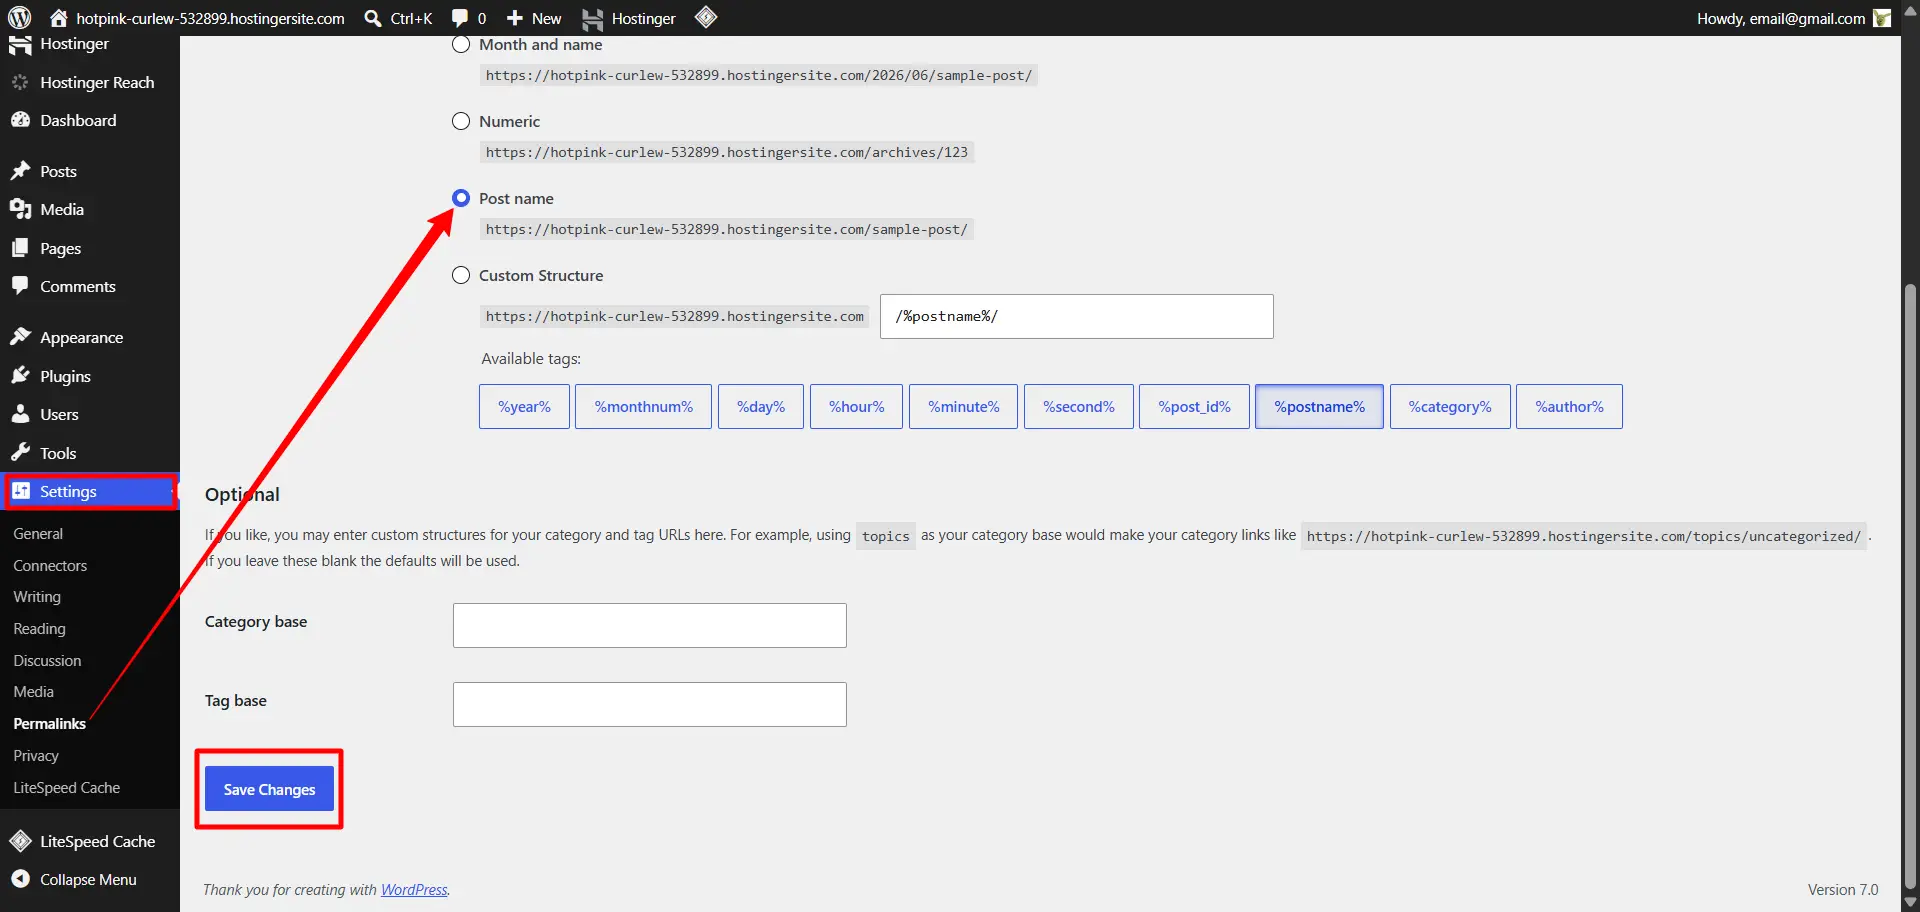
- Change your Permalink structure for SEO-friendly URLs.
- Delete the default post, page, and sample content.
- Install a lightweight WordPress theme.
Permalink Setting, make sure ‘post name’ is selected and than save changes. See below screenshot:
Common Installation Problems and Solutions
Although installing WordPress on Hostinger is straightforward, you may encounter a few common issues during the setup process. Here are some quick solutions:
Domain Not Connected
If your domain isn’t loading the website, check that it is correctly connected to your Hostinger hosting account. DNS changes can take up to 24–48 hours to fully propagate.
Can’t Access the WordPress Login Page
Make sure you’re visiting the correct login URL:
https://yourdomain.com/wp-admin
Also, verify that WordPress has been installed on the correct domain.
Forgot Your Password
If you can’t log in, click the Lost your password? link on the WordPress login page to reset your administrator password via email.
SSL Certificate Not Working
If your website displays a “Not Secure” warning, enable the free SSL certificate from your Hostinger hPanel. It may take a few minutes to activate.
Installation Failed
If the installation doesn’t complete successfully, try running the Auto Installer again or contact Hostinger’s support team for assistance.
Frequently Asked Questions
Is Hostinger Good for WordPress?
Yes. Hostinger is one of the best hosting providers for WordPress. It offers one-click WordPress installation, LiteSpeed servers, free SSL, automatic updates, and an easy-to-use hPanel, making it a great choice for beginners and experienced users alike.
Can I Install WordPress for Free?
Yes. WordPress itself is free and open source. However, you’ll need web hosting and a domain name to make your website accessible online. Many Hostinger plans also include a free domain for the first year.
How Long Does Installation Take?
Using Hostinger’s one-click Auto Installer, WordPress can usually be installed in less than a minute.
Do I Need Coding Skills?
No. You don’t need any coding or web development experience to install WordPress on Hostinger. The entire installation process is completed through Hostinger’s user-friendly dashboard.
Final Thoughts
Installing WordPress on Hostinger is quick and beginner-friendly. With the one-click Auto Installer, you can have your website up and running in just a few minutes without any technical knowledge.
Once WordPress is installed, you’re ready to customize your website, install themes and plugins, create pages, and start publishing content. Whether you’re building a personal blog, business website, portfolio, or WooCommerce store, Hostinger provides everything you need to get started.
If you follow the steps in this guide, you’ll have a fully functional WordPress website ready to grow online.